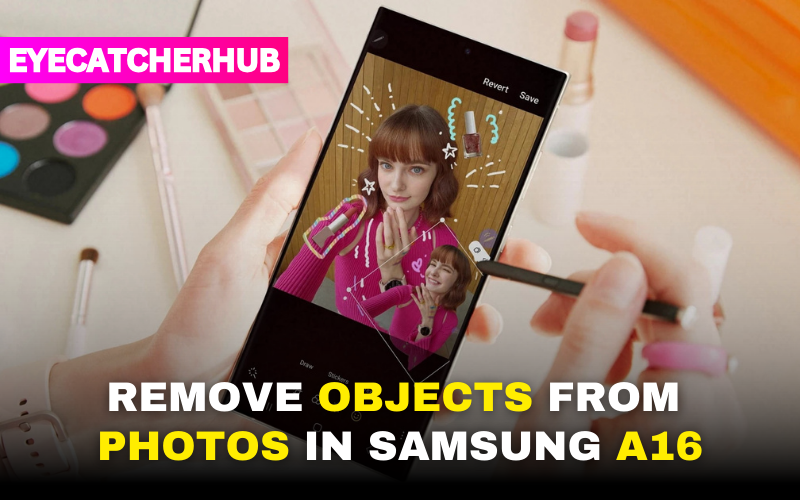
Samsung Galaxy A16 does not comes with a built-in Object Eraser feature within the photo editing tools but you can remove objects by using Google Photos Magic Eraser tools that allow users to remove adverse objects from photographs. Plus, it detects and matches the surrounding pixels to make sure the deleted object is gone.
This feature comes in handy when you need to:
Remove unwanted people/objects in the background
Eliminate all the elements ruining your photograph aesthetics.
Remove any distractions from your images.
Remove clutter and keep the subject in the center.
Easily enhance the composition of the photo.
So, let us delve into the steps to use Object Eraser properly.
How to Remove Objects Using Magic Eraser on Samsung A16 Guide
Step 1: Launch Google Photos application
First off, launch the Google Photos app on your Samsung Galaxy A16. It is a popular app for saving and editing photos.
Step 2: Allow Access
If you’re using Google Photos for the first time, you’ll have to grant permission for it to access your photos and media. Press Allow to gain access to your gallery.
Step 3: Select the Photo
Open your Gallery and choose the photo you want to remove an object. Tap on the photo to open it.
Step 4: Tap on Edit
When that image opens, find the Edit option at the bottom of the screen. Hit it, and you will be taken into the editing interface.
Step 5: Find the Tools Option
Once you tap on Edit, nudge the menu options over a bit to locate Tools. This section includes different edit options, such as the Object Eraser option.
Step 6: Select Magic Eraser
Once there, scroll down to the Tools section and find Magic Eraser (in some versions, Object Eraser). Just tap it to enable the tool.
Step 7: Select the Object to be Removed
Now trace around the object you want to erase. You do this either by tapping on it or tracing around it. It will automatically detect the object and highlight it for you.
Step 8: Erase the Object
Just hit Erase or Remove after marking the object you don’t want. Samsung’s AI will analyze the image and will smoothly blend the background, thus eliminating the object.
Step 9: Review and Save
After removing the object, see if the photo appears well. You can reverse the changes if necessary or fine-tune the edit. When done, hit Save to save the edited photo on your gallery.
Advanced Text Edition using Object Eraser
Marking objects with precision
To improve the outcome, ensure to accurately outline the edges of the object you want to erase. If the selection is too harsh, the backdrop may not blend well.
Try Multiple Edits
If the object is large or complex, consider removing it in small pieces, rather than in one big selection. This can really help in attaining a more natural edit.
Using Alternative Editing Tools if Required
If the Object Eraser doesn’t quite get the job done in a few filters, you can use other tools such as Crop or Blur the image to get it tailored to the way you want it.
Play With Lighting And Shadows
If you’re having trouble perfecting the edit, try fiddling with the brightness, contrast and shadows after erasing the object to make the edit appear more naturally.
Zoom In for Better Accuracy
Zooming in can help you more accurately mark the area when removing small objects, giving you a more natural finish.
Eraser + Cloning Tools
You can make the results even better with more advanced cloning or retouch tools found in third-party apps for more complex backgrounds.
Common Problems and How to Solve Them
Magic Eraser Not Showing Up
If it is up to date, check that your Samsung Galaxy A16 software & Google Photos is up to date.
Force quit and restart the Google Photos app and retry.
If you are running an older version of the app, try updating.
Erased Area Looks Blurry
Delete the object in smaller sections
Add some additional editing tools like blur and sharp to make the edit smooth.
Perform color correction, or utilize touch-up tools to make sure the background blends in seamlessly.
The Object Is Not Fully Deleted
If the object is still visible as a ghost and can be identified, repeat the procedure or touching up by hand with another editing tool.
If the option is available, try increasing the eraser’s sensitivity in settings.
The post Alternative Apps for Object Removal appeared first on Digital Photography School.
Other than Google Photos Magic Eraser, if you’re looking for alternative apps for object removal, check out these great apps:
Snapseed – A strong photo editing app with a healing tool that removes objects.
Adobe Photoshop Express – Provides advanced tools to remove unwanted objects.
TouchRetouch — For removing objects from pictures.
PicsArt – AI-powered Object removal+Creative filters
YouCam Perfect – Helps to remove unwanted elements and enhance your image quality.
These apps can be a useful workaround when the built-in Object Eraser doesn’t quite get the job done.
Final Thoughts
The Object Eraser is accessed from your Galaxy A16’s Google Photos editor, and it is a phenomenal mobile photographer’s buddy. It helps you own your images by eliminating everything that distracts from what you want them to be: shooting a sunset and having some uninvited tourist photobomb your otherwise perfect shot would now no longer mean something to any level. Here is a quick touch-up to save the memory from eyes closed.
It’s not just about removing distractions; it’s much bigger than that-a way to enhance your vision and creativity. It lets you do what you have to improve your compositions, the subjects, and much more to finally narrate your story. You are either a pro or someone who loves beautiful moments in everyday lives through a camera- now you have such an opportunity with Object Eraser.
The main key is exercising and experimenting: use the Object Eraser on all kinds of photos: landscapes, portraits, close-ups, and even group shots. Observe the ability of the AI to deal with distinct textures, patterns, and object sizes. The more you will be using it, the better predictor you will become regarding what and how its results will render an edit.
So, pick up that Samsung Galaxy A16 and get to it. Go into mobile photo editing, have fun with the Object Eraser tool, and let the photographer within shine for all to see. It’s a little creativity with the right tools that will allow you to turn everyday snapshots into unforgettable memories.